There is a well-known problem with HP ink printers
that many people have to deal with
over the life of their device.
If you've been lucky enough to avoid
this trouble so far,
you shouldn't be happy about it.
Because, whether you print a lot or not at all,
your printer cartridge base will probably
get stuck at some point.
There are many reasons an HP printer cartridge
might get stuck on the right side.
Here is a list of all the most common reasons
why this HP problem happens and the best ways to fix it.


When an Ink Cartridge Carriage is stuck
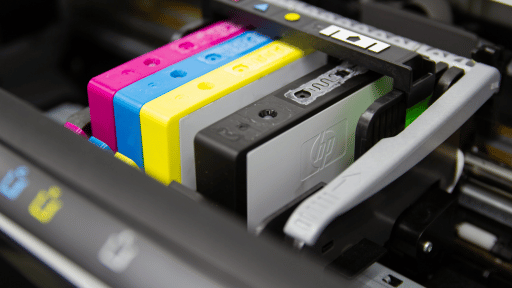
The carriage is a part of your HP printer that holds the ink refills.
It goes back and forth along its path,
putting ink on the paper you want to print.
Some of the signs that your HP printer's ink cartridge
has stopped working are:
- "The print cartridge carriage is stalled error" comes up.
- Printing stops all of a sudden
- The machine won't make copies.
- The lights for Check Paper and Check Cartridge start to flash.
When this happens, the printer may make a grinding sound
as it tries to move the carriage.
But because the arm that moves the carriage is stuck,
the carriage can't move at all.
Why the printer's cartridge won't move
Most of the time, when an HP printer cartridge
gets stuck on the right side,
it is because of a paper jam.
On the other hand, a paper jam is most often caused
by putting too much paper into the printer.
You should only push on the paper until it stops moving.
If you keep pushing it in, the sheet will be pushed into the wheels.
When this happens,
the printer feeds in more than one page at a time,
which causes jams.
If you don't know what you're doing when you
replace or install HP Ink Cartridges,
the printer can also show a carriage stall error state.
Because of this, it's very important to carefully
put the printer cartridges in the right way.


How to fix a stuck HP ink cartridge
When the carriage gets stuck,
your HP printer won't be able to print
anything else until the problem is fixed.
Here are some useful ways to solve
the problem quickly and easily:
1. Reset the HP printer to get rid of any print process errors
- Remove the power wire from the back of your printer while it is still on.
- Pull the power wire out of the wall outlet.
- Give the printer at least 15 seconds to cool down.
- Plug the power cord back into the plug and turn the printer back on.
- Let the thing warm up first.
- Please wait until it stops making noise before you do anything else.
- Take out the Paper Tray and put white, clean paper in it.
- Check to see how well the paper feeds.
- Align the paper properly and make the necessary changes to the Input Tray.
- Do a test print to make sure the printer works well.
- If it doesn't work, move on to the next solution.
2. Check that the Paper Tray isn't bent
and that it's in the right place when you close it
- Please turn off and unplug your device.
- Get any paper out of the Paper Tray and then pull the tray away from the device.
- Put a measure or something else straight along the back edge of the Paper Tray to make sure it is bent.
- If there is a gap between the ruler and the tray that is wider than 1 mm, the tray is bent.
- If the Paper Tray isn't bent, you can move on to the next step. If it is, you will need to get a new tray.
- Put the Paper Tray back where it was before.
- To get to the bottom of the printer, turn it on its side.
- Make sure to keep the Scanner Lid in a safe place with your hands as you turn the device.
- Please make sure that the plastic tab on the Paper Tray is firmly attached to the closure slot.
- If you need to, open and close the tray a few times until the tab fits into the slot.
- Put the printer back where it was before.
- To turn on the device, plug in its Power cord and then press the Power button.
- Conduct a test print. Move on to the next option if the problem is still there.
3. Find and remove any piece of paper
or other object that is stopping the Ink Cartridge Carriage from moving
- Please turn on your printer and open the door where you can get to the ink cartridges.
- Wait until the Carriage stops moving and stops making noise before you move on.
- As a safety measure, remove the Power line from the back of the device while it is still on.
- Use both hands to carefully pull out any paper that is stuck inside.
- Check the Carriage from top to bottom for paper shreds that could be stopping it.
- If there are still bits of paper inside the printer, more jams are likely to happen.
- You can move the Carriage by hand by putting your hand in the Ink Cartridge Access Area and then moving the Carriage.
- If the Carriage is stuck on the right, move it to the left, and vice versa. Also, if the Carriage is in the middle, move it to the right.
- Throw away any other small pieces or strange objects you find inside the printer.
- Try gently pushing the Carriage from side to side to see if it can go all the way through its path.
- Close the Cartridge Access Door, put the Power cord back in, and then turn on the device.
- Conduct a test print. If the problem keeps happening, try the next idea.
4. Please turn on your device and lift its lid. Wait until the Carriage moves toward the center before you move on
- Take the printer's ink refills out. Put them on top of a clean piece of paper to stop any leaks that might happen.
- Check to see if the Nozzles are clogged, and use a clean, lint-free cloth dampened with warm water to clean them well.
- If the amount of ink in your cartridges is low, you may need to buy new tanks.
- Place the Ink Cartridges back into their slots and lower the Printer Lid to close it again.
- Conduct a test print.
If the problem still exists, it's time to call in a professional.
Check to see if your printer's insurance is still good,
and if it is, call HP support to see if they can help.


